Sunday 10 May 2020

Subscribe platform event from an external app using EMP Connector


Subscribe Platform Event from an External app using EMP Connector

      External apps can subscribe to platform events with CometD and perform long polling. CometD is a scalable HTTP-based event routing bus that uses an AJAX push technology

   Salesforce provides a Java library, EMP Connector, which implements all the details of connecting to CometD and listening on a channel. You can use EMP Connector to subscribe easily to platform events.


EMP Connector is a free, open-source, community-supported tool. Salesforce provides this tool as an example of how to subscribe to events using CometD. EMP Connector is based on Java 8 and uses CometD version 3.1.0. It supports username and password authentication and OAuth bearer token authentication. This walkthrough shows steps only for username and password authentication.


Let's look at an example:

Step1: Create a platform Event Object


As you can see in the screenshot I created one PE and added a custom  text field "Account_Name__c"

Step2: Create a process builder on Account to publish Platform Event 


when an account record is created or edited this process builder will create a record in Platform Event Object(publish a PE)

Step3: Subscribe Platform Event from an external application

1. You can download the EMP Connector project from:
https://github.com/forcedotcom/EMP-Connector
and then extract the zip to a local folder.  

2. In Eclipse, import the Maven project from the folder where you cloned or extracted the project. The dependencies that are specified in the Maven’s pom.xml file, such as CometD, are added in the Java project in Eclipse.   


3. You Subscribe to an event channel by running the LoginExample class(/src/main/java/com/salesforce/emp/connector/example folder)

Related Post:


Sunday 3 May 2020

Publish platform events from an external application


Publish platform events from an external application using Salesforce API

External apps use an API to publish platform event messages. You can publish events by creating records of your event in the same way that you insert sobjects. You can use Salesforce APIs to create platform event records.

Let's look at one example:

Step1: Create a platform Event Object


As you can see in the screenshot I created one PE and added a custom  text field "Account_Name__c"

Step2: Create a trigger on PE object to subscribe to Platform Event 


This after trigger will subscribe to Platform Event and create accounts with the event message name.

Step3: Publish Platform Event

You can use sobject REST endpoint to publish:


/services/data/v48.0/sobjects/Account_Event__e/


Request body for a POST request will be like this :


{
  "Account_Name__c":"New PE Test Account"
}


Like this, you can publish a platform event from outside salesforce and you add your all logic in PE trigger.

Related Post:


Saturday 2 May 2020

Integrating with Salesforce using Platform Events


Integrating with Salesforce using Platform Events

     
        If you want to integrate Salesforce with multiple External Systems, and that you only want the External Systems to receive data from Salesforce. let’s say you want to notify an external system(s) whenever a record changed in salesforce. In this case, you can use callouts/outbound messaging but that will mean Salesforce takes care of every callout and callout logic. This is where you can use Platform Events. In this case, whenever there’s an update, you just Publish an Event and then Subscribers(external system) keep on listening to the Salesforce Event bus.

      You can also use Platform Events when you want an External System notifies Salesforce, where the External System Publish the change on the Salesforce Event Bus and then Salesforce listens to those Events and salesforce can perform actions using the platform event trigger as required whenever get the notification.

Platform Event:

The Salesforce enterprise messaging platform offers the benefits of event-driven software architecture. Platform events are the event messages that your apps send and receive. They simplify the process of communicating changes and responding to them without requiring you to write complex logic. Publishers and subscribers communicate with each other through platform events. One or more subscribers can listen to the same event and carry out actions.

Publishing Platform Event: 
  • Using APEX you can Publish Platform Events.
  • Publish Events using Declarative tools (Process Builder/flow).
  • Publish Events Messaging using Salesforce API from an external app.
Subscription of Platform Event: 
  • Apex trigger on the event object to subscribe to incoming events.
  • Lightning component apps and Visualforce can receive events through CometD.
  • In an external app, you can subscribe to events using CometD as well. 
Replay Option(ReplayID) for Event Retention:

Each event record contains a system field, called ReplayID, that the system populates after the event is published.
                    
Platform event setup
PE Setup


Usage: Catch up on missed events after a certain event message, for example, after a connection failure. To subscribe with a specific replay ID, save the replay ID of the event message after which you want to retrieve stored events. Then use this replay ID when you re-subscribe.
               ReplayID refers to the position of the event in the event stream. Replay ID values are not guaranteed to be contiguous for consecutive events(-2 option to receive events from the beginning and –1 option to receive new events). You can retrieve stored event messages as long as they are within the retention window of 72 hours.


ReplayID Stream


Publish Events using Salesforce API from an external app(External App to Platform app)


       External apps use an API to publish platform event messages. You can publish events by creating records of your event in the same way that you insert sobjects. You can use Salesforce APIs to create platform event records.

Usecase: Let’s say someone wants to return purchased merchandise to a vendor. An external system sends merchandise return requests to Salesforce for processing. The external system publishes a platform event to alert Salesforce to the merchandise return. An event listener (a trigger) in Salesforce receives the event and performs some actions. For example, the trigger might alert the sales representative to the return, and send a confirmation email to the customer.

Subscribe events from an external app (Platform to an external app)

External apps subscribe to platform events with CometD and perform long polling. CometD is a scalable HTTP-based event routing bus that uses an AJAX push technology

   Salesforce provides a Java library, EMP Connector, which implements all the details of connecting to CometD and listening on a channel. You can use EMP Connector to subscribe easily to platform events.

Usecase: When an opportunity closes in Salesforce, your company has won a deal with a customer. Let’s say you use vendors to ship products associated with an opportunity. Each vendor has an external app that processes shipment orders. The external app listens to platform events. When an opportunity closes, a trigger, which is part of a product order app in Salesforce, fires and publishes a platform event message. Each vendor app is notified of the event and creates a shipment order for a specific product.
Subscribe events from an external application


Key points to remember when you considering the platform event for your integration:

  • PE is designed for Pub/Sub integration model
  • PE is not supported to transfer a lot of data(The maximum event message size that you can publish is 1 MB).
  • You can use PE when you only want to “notify” the external system(s) with an event or message with minimal information for them to act upon.

Friday 15 November 2019

How To Use Static Resource In LWC


Use Static Resource In Lightning Web Components

As we know Static Resources allow you to upload content that you can reference in a component such as .zip and .jar files, images, style sheets, JavaScript, and other files Static resource. And it is very important while customizing salesforce.

To access Static Resources in  Lightning web components first we have to import  from "@salesforce/resourceUrl/<yourResourceName >" to component's js

@salesforce: Modules scoped with @salesforce add functionality to Lightning web components at runtime.


 This will Import your static resources :

import resourceName from '@salesforce/resourceUrl/resourceName';


    Static resource in lwc
  1. From Setup, enter Static Resources in the Quick Find box, then select Static Resources, and then click New.
  2. Enter YourResourceName for the Name.
  3. Click Choose File, and then choose the YourResource file
  4. Click Save.


Let’s look at some sample code:


StaticResourceDemo.js
import { LightningElement } from 'lwc';
import BearLogoURL from '@salesforce/resourceUrl/Bear';
export default class StaticResourceDemo extends LightningElement {
    salesforceBear   =  BearLogoURL;
}
StaticResourceDemo.html
<template>
    <div class="app slds-p-around_x-large">
        <h1 class="slds-text-heading_large">Lightning Web Component</h1>
            <lightning-layout>
                <lightning-layout-item >
                    <lightning-card title="Static Resource..." icon-name="custom:custom9" >
                     <img src={salesforceBear} alt="salesforce Bear Image" />
                </lightning-card>
            </lightning-layout-item>
        </lightning-layout>
    </div>
</template>

Consideration while creating  Static Resources

  • A static resource name can contain only underscores and alphanumeric characters.
  • Must be unique in your org.
  • It must begin with a letter, not include spaces, not end with an underscore, and not contain two consecutive underscores.


Tuesday 14 March 2017

AD/SSO Authentication in Salesforce


AD/SSO Authentication in Salesforce


Abstract:


As resources move to the cloud, users experience a proliferation of credentials - the usernames, passwords and, sometimes, devices they use to log in (or authenticate) to cloud-based services. Single sign-on technologies come to the rescue, allowing users to authenticate at a single location and access a range of services without re-authenticating.

SAML 2(Security Assertion Markup Language).configure single sign-on for SalesForce using ADFS 2.0.  This is a really nice solution because it’s easy to set up and doesn’t cost you anything except the Windows 2008 OS license
ADFS 2.0 is Microsoft’s answer to federation – it includes their own implementation of SAML 2.0.  It runs on Windows Server 2008 and is installed from a separate downloadable package.


1.SSO Authentication:
Single sign-on (SSO) is a session and user authentication service that permits a user to use one set of login credentials (e.g., name and password) to access multiple applications.
The service authenticates the end user for all the applications the user has been given rights to and eliminates further prompts when the user switches applications during the same session.

Single Sign-On is a process that allows network users to access all authorized network resources without having to separately log into each resource. Single Sign-On also enables your organisation to integrate with an external identity management system or perform web-based single sign-on to Force.com. Single Sign-On enables multiple types of authentication integration, but the most common are:

  • Use an existing directory of user names and passwords, such as Active Directory or LDAP, for Salesforce users
  • Allow seamless sign-on to Force.com applications, eliminating the need for explicit user log on actions

1.1.How Single Sign-On Works


  1. When a user tries to log in—either online or using the API—Salesforce validates the username and checks the user’s profile settings.

  1. If the user’s profile has the "Uses Single Sign-on" user permission, then Salesforce does not authenticate the username with the password. Instead, a Web Services call is made to the user’s single sign-on service, asking it to validate the username and password.

  1. The Web Services call passes the username, password, and sourceIp to a Web Service defined for your organization. (sourceIp is the IP address that originated the login request). You must create and deploy an implementation of the Web Service that can be accessed by Salesforce.com servers.

  1. Your implementation of the Web Service validates the passed information and returns either "true" or "false."

  1. If the response is "true," then the login process continues, a new session is generated, and the user proceeds to the application. If "false" is returned, then the user is informed that his or her username and password combination was invalid.

1.2.Options for Implementing SSO on Force.com:

Delegated authentication

Using delegated authentication, Force.com does not validate passwords but instead uses an external Web service to validate user credentials. When a user attempts to log in, the platform checks the user's profile to see if they are enabled for SSO. If so, it makes Web services call to the endpoint specified by the organisation (environment), asking it to validate the username and password.

Federated Authentication

As with delegated authentication, federated authentication does not validate the user's actual password on the Force.com platform either. Instead, the platform receives a SAML assertion in an HTTP POST request. The SAML assertion has a limited validity period, contains a unique identifier, and is digitally signed. If the assertion is still within its validity period, has an identifier that has not been used before, and has a valid signature from a trusted identity provider, the user is granted access to the application.
Saml 1.png

1.3.Open-source software project that provides SAML

1.4.Benefits of Implementing SSO

  • Improved productivity - Not having to enter a password each time a user needs to access a resource saves time and makes users more productive
  • Increased adoption -SSO reduces the barriers to use for resources. Since it is easier to access applications, users will start using them more.
  • Centralized user access control -
  • Improved reporting and monitoring - A single repository for auditing and logging access to resources provides streamlined regulatory compliance.
  • Increased security - secure, enterprise-wide infrastructure with common password and security policies that can be centrally managed and secured
  • Uniform security layer -SAML is platform agnostic allowing enterprise architects to implement a uniform security layer with existing assets.
  • Reduced helpdesk costs -.


2.Active Directory
Active Directory (AD) is a directory service that Microsoft developed for Windows domain networks. It is included in most Windows Server operating systems as a set of processes and services.
3.AD/SSO Authentication
Now it is possible to configure a seamless single sign-on experience from a Microsoft environment to Force.com (and hence other salesforce.com products) without a third-party federation product. Starting with Windows Server 2008, however, Active Directory became an umbrella title for a broad range of directory-based identity-related services.


salesforce.com introducing support in the Winter '09 release (October 2008) and Microsoft in Active Directory Federation Services (AD FS) version 2.0

3.1.Overview

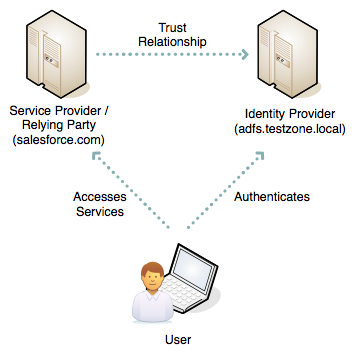
SAML 2.0 defines several roles for parties involved in single sign-on:
ADFSSAML2 Roles.png
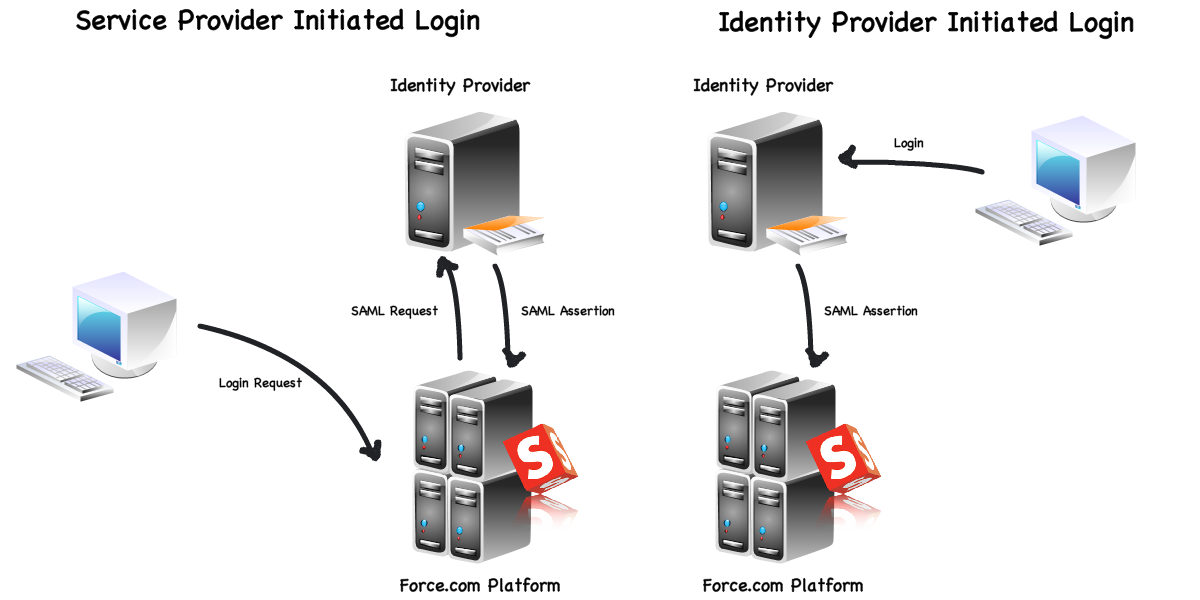
The user authenticates (logs in) to the identity provider (or IdP) - in our case, this will be AD FS 2.0. The user is then able to access a resource at one or more service providers (abbreviated as SP, and also known as relying parties) without needing to log in at each service provider.

The diagram below shows the process for an IdP-initiated login into SalesForce – later we’ll look at SP-initiated login.
  1. The user authenticates to the ADFS server using Kerberos and requests login to SalesForce
  2. ADFS returns a SAML assertion to the user’s browser
  3. The browser automatically submits the assertion to SalesForce who logs the user in

Configuration

To build a federation between two parties we need to establish a trust by exchanging some metadata.  The metadata for our ADFS 2.0 instance is entered manually into the SalesForce configuration.  SalesForce metadata is downloaded as an XML file which ADFS 2.0 can consume.

Summary

Applications running on the Force.com platform have access to SAML 2.0 cross-domain Web single sign-on, as does Microsoft Active Directory Federation Services 2.0. We can configure the two systems to enable seamless SSO from the Windows desktop to Force.com without the need for any additional third-party products.